Cutting day! Ive set up a straight edge to follow, to get as straight of a cut as possible. I have first scored the surface with an 1/8" straight router bit to minimize chipping. I attempted to finish the cut with a jig saw, but found that the blade still wanted to wander a bit, so I finished it with a circular saw, and straightened up the edges afterwards. This was one of those cuts that I thought about for days, and still had surprises!
 After cleaning up the edges, Ive attached the rear bull nose, and dry fit the top to make any adjustments.
 Getting ready to biscuit join everything back together with glue and underside supports...
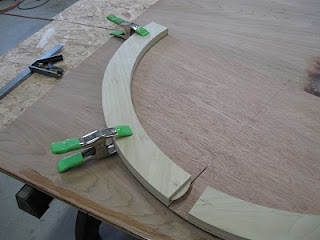
 Ive put a pipe clamp on the stable end, and used it as an anchor for the strap clamps. Everything needs to be in place before any glue is applied. This will set for a day to cure...
 Ive attached the support legs underneath, and have cleaned up the edges and applied the front bull nose. A little sanding helps new blend with old. In this situation, its tough at best to get a perfect fit, but this came out really close! Im happy with the result. Really the only choice to get all the profiles dead on is to do the entire project in the shop from start to finish - this is more of a retrofit situation.
 The drawer has been mounted...
 Here is a pic of the support legs. Getting the proper angles made the new legs look just like the original.
The polyurethane has been applied, and I will have some final pictures posted shortly!
Part of the work to be done in Minster is to make and install a new screen door on the front also. I am starting with this part of the project, while issues with the main door are worked out (glass size, etc).
I made another template of my original paper template. Three templates are better than two! Ive transferred the template outline to the wood for the screen door. This will allow me to make the screen doors arch in two seperate pieces. I will join all the pieces together using biscuits and glue. Here are some pictures of the screen door arch construction...


Read More..
I made another template of my original paper template. Three templates are better than two! Ive transferred the template outline to the wood for the screen door. This will allow me to make the screen doors arch in two seperate pieces. I will join all the pieces together using biscuits and glue. Here are some pictures of the screen door arch construction...
Ive built two base cabinets for either side of the window. These are 24" deep and will have bookshelf sections above. Ive also assembled the tops for these, and trimmed them out underneath. There will be a window seat between the two side towers. Ive used basic cabinets construction and pocket hole joinery for the tops - see previous posts on how to do this.


 From this weeks New Yorker ... Sept. 14, 2009
Minggu, 28 Februari 2016
Some final pictures of the shelving project. Heres a shout out to Fred Heywood of Simply Built, who helped manage and coordinate the project, and Bob Plunkett who worked along with us to make it happen. If you recall, Bob painted one of my built ins in Sylvania, Ohio. We have a few touch ups to do, but are pretty much done with this phase of the project.


Ive been working on a remodel project in Sylvania, Ohio, and have put up some new walls to create a new bathroom, leveled out the ceiling in the hallchoice, and installed a new french door. Soon to come will be a lam beam installation, to create a large family room!


Today Ive added the outside corner shelves. These will offset the entire look, but pull it all together also.
 Ive also added the white background behind the tv area...
 The speakers will fit nicely in the corners! The doors for the lower sections will be made and installed tomorrow, and the crown molding will finish it off. All that will be left is filling the nail holes, tightening it all up, and touch up paint.

 Read More..
Ive also added the white background behind the tv area...The speakers will fit nicely in the corners! The doors for the lower sections will be made and installed tomorrow, and the crown molding will finish it off. All that will be left is filling the nail holes, tightening it all up, and touch up paint. Finalizei hoje este projeto que já estava na minha pilha "a fazer", desde o meu começo nesta técnica.
O desenho é da Sheila Landry Designs que é uma referencia mundial em questão de Patterns (desenhos). Espero que gostem, e como quase todos os meus trabalhos, também este está disponível para venda. Em caso de interesse por favor entre em contato comigo. Obrigado
Here are the final pics of the desk - ready to be delivered tomorrow afternoon! The poly application came out nice! Ive installed the hardware and it looks great as well!


Read More..
 Beets
BeetsWell, if you look up to the title of this blog, its called a photo journal, so, occasionally, woodworking readers, youll have to permit me to wander through the woods or my yard and issue a journal report. This is one of those times.
We have had an excruciatingly wet and cold summer to date. The joke was, in Vermont, last month was renamed Juneuary. Anychoice, today when the phone woke me from my after work nap, it was one of those 6 oclock afternoons where all the light is right, everywhere you look, and everything is beautiful and all seems right with the world. Kit gets ALLLLLL the credit for the gardens. I applaud and eat. Click the pictures to enlarge them ...
 The front porch
 The slanting sunlight in the dining room
 This choice to the porch
 The back yard
 Kits vegetable garden
 Outside the garden, buffalo rising a new steel sculpture by Sam and Dan
 The front walk garden ...
 The pond with goldfish
 Some decorative grasses ...
 Day lillies and blueberries .. Its their time to shine
 The shadow on the stairs on the choice to my home office where I write this ...
Lets hope we get more summer afternoons soon ...
OK ... Thanks everybody ... Ive gotten comments from my own blog and two other forums that I sometimes post on ... I will, (soon I hope), be writing a definitive policy that I can post on my website and link to as a warning if a design process seems to be getting out of control ... My problem with the situation below was that I KNEW it was out of control, but thought it was just one email aawy from resolution ... Been there, done that ... time for a change.
" New Design Fee Policy ... 5/31/09 "
" Over the years I have alchoices considered the interpreting of my customers’ ideas, both potential and repeat customers, part of my job description, and, unless it was obviously going to be a major undertaking, (a library, a large entertainment center, a kitchen) a free service to them. In the past most of my customers came to me by word of mouth with some background from the person who referred them to me and this ‘free design’ policy was a fine one. With the rise of the internet as a referral tool, more and more people come to us, (thankfully), but with no introduction and no in person visit to our shop where they can plainly see the nature and scope of our business. As a result, sometimes the design process has the potential to get out of hand as it’s very easy to say, ‘I’d like an estimate on a coffee table sort of like this, but maybe like that … Nooooo.. that’s not what I had in mind …. ‘ in an email. I recently had a 34 email exchange with a potential client regarding a small project that sucked up an unbelievable amount of my time. It was a ‘rush’ job and I alchoices thought I was just ‘one more email’ achoice from the resolution of it. I was so sure I even made sample inlays in abalone and mother-of-pearl before receiving a nickel from them. (WHAT WAS I THINKING?) Anychoice, the process came to an ugly end and left me pondering how best to avoid this in the future. After a little more consideration, I will be probably be posting this policy to my website and will refer potential new clients to it if it seems appropriate.
Here’s what I’ll do for free :
Have a meeting or two of reasonable length, say an hour or so, at my shop or at their house close by …. No Charge …. More than ½ hour travel time from my shop, meetings MAY involve travel time reimbursement. The client will be informed in advance and the charge will be assessed at my discretion, probably depending on how the meeting seems to go.
Provide concept sketches and one CAD scale drawing … No Charge
If design is ‘close’ but not finalized, I’ll provided a non binding ESTIMATE of the project’s cost including shipping and installation. No Charge
If we move on from there without at that time, a formal agreement, I will request a non-refundable, but applied to the total cost, design fee that seems appropriate to the project at hand, most likely a two to four hour fee amount. If that is used up, we probably have a problem and we’ll have to take it from there with a new design fee agreement ….
I hope this is clear and that it will help both me and my customers to understand that design is not something that happens but is a sometimes complicated and time consuming process. And, time is really all we’ve REALLY got.. "
Here are the other comments ...
UK Workshops .. Project,Shops and Pat Mistakes Forum UK Workshops
Fine woodworking Knots Forum
ORIGINAL POST starts here ...
 Ok .... Id really appreciate some comments here. I recently had a potential customer who was referred to me by a fellow woodworker and friend. She wanted to have a special table made and was in kind of a hurry... in the next month I believe were the words in her initial email. My friend thought I would be perfect for the job as I have several employees, try to be flexible with my scheduling and enjoy the kind of inlay work she said she was interested in. Time was short so I sent her some sketches. Then I sent her some CAD drawings. Then we went back and forth and back and forth until my inbox looked like this (click the photo to enlarge it) ...
 and my sent messages had 14messages sent to her, AND, I have a different computer at work where I was also sending messages regarding this project. I thought the design concept could be cool and I was interested, but she was not interested in any wood except quilted big leaf maple and was stunned by the cost (as was I) of solid wood in that species. So, I said I would try to do an inlay in the commercial veneer she liked. Typically if we are inlaying abalone in veneer we make our own 1/8" thick veneer so we can actually sand the in lay after its stuck in there. . Commercial veneer is only a 42nd of an inch thick so theres not much room for sanding. Then, I cant believe I actually did this without a deposit, but I made a sample inlay (above) (from her photo) to see if we could do an abalone inlay in commercial veneer and Trevor pulled it off. In the end it all went bad. She said she mailed me a check from in state on a Wednesday, and it hadnt come by the following Monday, plus, I had some normal jobs com in in the meantime, (meeting, drawing, check) plus, she no longer liked my cattail design, which I copied from the photo that she sent me and the inlay was the wrong size ... By that time, I couldnt order the veneer and get the table done in time so I told her I could do it later when we had more time to work on the design, or cancel the job and send her check back minus a small design fee. Well she flipped out on me and stopped payment on the check !.... What do you all think???? Big, complicated jobs, no problem ... We do a little design work for free and then were on the clock. Smaller jobs, (1000-5000),at what point does the designer bring up a design fee ??? After the first sketch?The second. third or 10th email? After thirty years I should have a handle on this, but, I admit, I dont. Design is the fun part of it for me and I like to think Im pretty quick at it so normally its not a problem on a smaller job. But, occasionally, and more often lately, with inquiries from the internet and the economy not so robust, it seems like I (we ALL) should have some kind of policy to cover instances like this .... Comments anyone? Please ....
 My first email response
 Her dragonfly pushplate photo and my drawing over it
 My first CAD drawing
 The final folder before the end ....
Read More..
" New Design Fee Policy ... 5/31/09 "
" Over the years I have alchoices considered the interpreting of my customers’ ideas, both potential and repeat customers, part of my job description, and, unless it was obviously going to be a major undertaking, (a library, a large entertainment center, a kitchen) a free service to them. In the past most of my customers came to me by word of mouth with some background from the person who referred them to me and this ‘free design’ policy was a fine one. With the rise of the internet as a referral tool, more and more people come to us, (thankfully), but with no introduction and no in person visit to our shop where they can plainly see the nature and scope of our business. As a result, sometimes the design process has the potential to get out of hand as it’s very easy to say, ‘I’d like an estimate on a coffee table sort of like this, but maybe like that … Nooooo.. that’s not what I had in mind …. ‘ in an email. I recently had a 34 email exchange with a potential client regarding a small project that sucked up an unbelievable amount of my time. It was a ‘rush’ job and I alchoices thought I was just ‘one more email’ achoice from the resolution of it. I was so sure I even made sample inlays in abalone and mother-of-pearl before receiving a nickel from them. (WHAT WAS I THINKING?) Anychoice, the process came to an ugly end and left me pondering how best to avoid this in the future. After a little more consideration, I will be probably be posting this policy to my website and will refer potential new clients to it if it seems appropriate.
Here’s what I’ll do for free :
Have a meeting or two of reasonable length, say an hour or so, at my shop or at their house close by …. No Charge …. More than ½ hour travel time from my shop, meetings MAY involve travel time reimbursement. The client will be informed in advance and the charge will be assessed at my discretion, probably depending on how the meeting seems to go.
Provide concept sketches and one CAD scale drawing … No Charge
If design is ‘close’ but not finalized, I’ll provided a non binding ESTIMATE of the project’s cost including shipping and installation. No Charge
If we move on from there without at that time, a formal agreement, I will request a non-refundable, but applied to the total cost, design fee that seems appropriate to the project at hand, most likely a two to four hour fee amount. If that is used up, we probably have a problem and we’ll have to take it from there with a new design fee agreement ….
I hope this is clear and that it will help both me and my customers to understand that design is not something that happens but is a sometimes complicated and time consuming process. And, time is really all we’ve REALLY got.. "
Here are the other comments ...
UK Workshops .. Project,Shops and Pat Mistakes Forum UK Workshops
Fine woodworking Knots Forum
ORIGINAL POST starts here ...
Ok .... Id really appreciate some comments here. I recently had a potential customer who was referred to me by a fellow woodworker and friend. She wanted to have a special table made and was in kind of a hurry... in the next month I believe were the words in her initial email. My friend thought I would be perfect for the job as I have several employees, try to be flexible with my scheduling and enjoy the kind of inlay work she said she was interested in. Time was short so I sent her some sketches. Then I sent her some CAD drawings. Then we went back and forth and back and forth until my inbox looked like this (click the photo to enlarge it) ... and my sent messages had 14messages sent to her, AND, I have a different computer at work where I was also sending messages regarding this project. I thought the design concept could be cool and I was interested, but she was not interested in any wood except quilted big leaf maple and was stunned by the cost (as was I) of solid wood in that species. So, I said I would try to do an inlay in the commercial veneer she liked. Typically if we are inlaying abalone in veneer we make our own 1/8" thick veneer so we can actually sand the in lay after its stuck in there. . Commercial veneer is only a 42nd of an inch thick so theres not much room for sanding. Then, I cant believe I actually did this without a deposit, but I made a sample inlay (above) (from her photo) to see if we could do an abalone inlay in commercial veneer and Trevor pulled it off. In the end it all went bad. She said she mailed me a check from in state on a Wednesday, and it hadnt come by the following Monday, plus, I had some normal jobs com in in the meantime, (meeting, drawing, check) plus, she no longer liked my cattail design, which I copied from the photo that she sent me and the inlay was the wrong size ... By that time, I couldnt order the veneer and get the table done in time so I told her I could do it later when we had more time to work on the design, or cancel the job and send her check back minus a small design fee. Well she flipped out on me and stopped payment on the check !.... What do you all think???? Big, complicated jobs, no problem ... We do a little design work for free and then were on the clock. Smaller jobs, (1000-5000),at what point does the designer bring up a design fee ??? After the first sketch?The second. third or 10th email? After thirty years I should have a handle on this, but, I admit, I dont. Design is the fun part of it for me and I like to think Im pretty quick at it so normally its not a problem on a smaller job. But, occasionally, and more often lately, with inquiries from the internet and the economy not so robust, it seems like I (we ALL) should have some kind of policy to cover instances like this .... Comments anyone? Please ....My first email responseHer dragonfly pushplate photo and my drawing over itMy first CAD drawingThe final folder before the end ....Here is the official new logo for the company. Designed by Joe Spoor at the Small Business Store - call him for all your ad and printing needs!


Langganan:
Postingan (Atom)


Popular Posts
-
 We finished the queen bed a couple of weeks ago ... just posting the photos now .. With the short rails for the studios photo Before the fin...
 -
 We started a new table this week. Its a custom version of the one above (shown on my website here) that we first made in 2004 for a client ...
 -
Kerryn attended night classes at heartwood creative woodworking for four years before founding too...
-
new free woodworking plans Welcome to absolutely f...
-
Buy, download and read teds woodworking pdf / plans is 16000 woodworking plans free download? on y...
-
free woodworking plans urn Here are your search re...
-
Woodweb provides information for the wood industry including woodworking, cabinets, components, wo...
-
 Thanks to Star for taking the time to paint and finish this project!
 -
 Beets Well, if you look up to the title of this blog, its called a photo journal, so, occasionally, woodworking readers, youll have to perm...
